语音聊天室,或多人语音聊天,是即时通信应用中常见的功能之一,比如,QQ的语音讨论组就是我们用得比较多的。
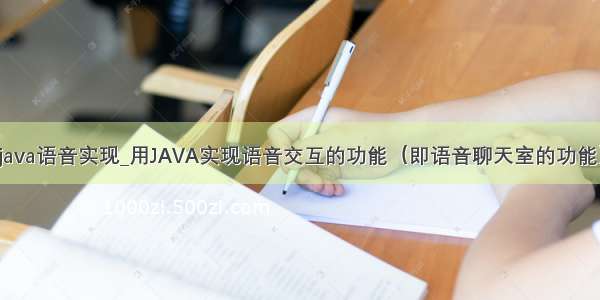
这篇文章将实现一个简单的语音聊天室,让多个人可以进入同一个房间进行语音沟通。先看运行效果截图:
从左到右的三张图分别是:登录界面、语音聊天室的主界面、标注了各个控件的主界面。
(如果觉得界面太丑,没关系,后面下载源码后,你可以自己美化~~)
一. C/S结构
很明显,我这个语音聊天室采用的是C/S结构,整个项目结构相对比较简单,如下所示:
该项目的底层是基于
二. 客户端控件式开发
客户端开发了多个自定义控件,然后将它们组装到一起,以完成语音聊天室的功能。为了便于讲解,我主界面的图做了标注,以指示出各个自定义控件。
现在我们分别介绍各个控件:
1. 分贝显示器
分贝显示器用于显示声音的大小,比如麦克风采集到的声音的大小,或扬声器播放的声音的大小。如上图中3标注的。
(1)傅立叶变换
将声音数据转换成分贝强度使用的是傅立叶变换。其对应的是客户端项目中的FourierTransformer静态类。源码比较简单,就不贴出来了,大家自己去看。
(2)声音强度显示控件 DecibelDisplayer
DecibelDisplayer 使用的是PrograssBar来显示声音强度的大小。
每当有声音数据交给DecibelDisplayer显示时,首先,DecibelDisplayer会调用上面的傅立叶变换将其转换为分贝,然后,将其映射为PrograssBar的对应的Value。
2.发言者控件SpeakerPanel
SpeakerPanel 用于表示聊天室中的一个成员,如上图中1所示。它显示了成员的ID,成员的声音的强度(使用DecibelDisplayer控件),以及其麦克风的状态(启用、引用)。
这个控件很重要,我将其源码贴出来:
public partial classSpeakerPanel : UserControl ,IDisposable
{privateChatUnit chatUnit;publicSpeakerPanel()
{
InitializeComponent();this.SetStyle(ControlStyles.ResizeRedraw, true);//调整大小时重绘
this.SetStyle(ControlStyles.OptimizedDoubleBuffer, true);//双缓冲
this.SetStyle(ControlStyles.AllPaintingInWmPaint, true);//禁止擦除背景.
this.SetStyle(ControlStyles.UserPaint, true);//自行绘制
this.UpdateStyles();
}public stringMemberID
{get{if (this.chatUnit == null)
{return null;
}return this.chatUnit.MemberID;
}
}public voidInitialize(ChatUnit unit)
{this.chatUnit =unit;this.skinLabel_name.Text =unit.MemberID;this.chatUnit.MicrophoneConnector.ConnectEnded += new CbGeneric(MicrophoneConnector_ConnectEnded);this.chatUnit.MicrophoneConnector.OwnerOutputChanged += newCbGeneric(MicrophoneConnector_OwnerOutputChanged);this.chatUnit.MicrophoneConnector.AudioDataReceived += new CbGeneric(MicrophoneConnector_AudioDataReceived);this.chatUnit.MicrophoneConnector.BeginConnect(unit.MemberID);
}public void Initialize(stringcurUserID)
{this.skinLabel_name.Text =curUserID;this.skinLabel_name.ForeColor =Color.Red;this.pictureBox_Mic.Visible = false;this.decibelDisplayer1.Visible = false;
}void MicrophoneConnector_AudioDataReceived(byte[] data)
{this.decibelDisplayer1.DisplayAudioData(data);
}voidMicrophoneConnector_OwnerOutputChanged()
{if (this.InvokeRequired)
{this.BeginInvoke(new CbGeneric(this.MicrophoneConnector_OwnerOutputChanged));
}else{this.ShowMicState();
}
}privateConnectResult connectResult;voidMicrophoneConnector_ConnectEnded(ConnectResult res)
{if (this.InvokeRequired)
{this.BeginInvoke(new CbGeneric(this.MicrophoneConnector_ConnectEnded), res);
}else{this.connectResult =res;this.ShowMicState();
}
}public voidDispose()
{this.chatUnit.Close();
}private voidShowMicState()
{if (this.connectResult !=OMCS.Passive.ConnectResult.Succeed)
{this.pictureBox_Mic.BackgroundImage = this.imageList1.Images[2];this.toolTip1.SetToolTip(this.pictureBox_Mic, this.connectResult.ToString());
}else{this.decibelDisplayer1.Working = false;if (!this.chatUnit.MicrophoneConnector.OwnerOutput)
{this.pictureBox_Mic.BackgroundImage = this.imageList1.Images[1];this.toolTip1.SetToolTip(this.pictureBox_Mic, "好友禁用了麦克风");return;
}if (this.chatUnit.MicrophoneConnector.Mute)
{this.pictureBox_Mic.BackgroundImage = this.imageList1.Images[1];this.toolTip1.SetToolTip(this.pictureBox_Mic, "静音");
}else{this.pictureBox_Mic.BackgroundImage = this.imageList1.Images[0];this.toolTip1.SetToolTip(this.pictureBox_Mic, "正常");this.decibelDisplayer1.Working = true;
}
}
}private void pictureBox_Mic_Click(objectsender, EventArgs e)
{if (!this.chatUnit.MicrophoneConnector.OwnerOutput)
{return;
}this.chatUnit.MicrophoneConnector.Mute = !this.chatUnit.MicrophoneConnector.Mute;this.ShowMicState();
}
}
(1)在代码中,ChatUnit就代表当前这个聊天室中的成员。我们使用其MicrophoneConnector连接到目标成员的麦克风。
(2)预定MicrophoneConnector的AudioDataReceived事件,当收到语音数据时,将其交给DecibelDisplayer去显示声音的大小。
(3)预定MicrophoneConnector的ConnectEnded和OwnerOutputChanged事件,根据其结果来显示SpeakerPanel空间上麦克风图标的状态(对应ShowMicState方法)。
3.MultiAudioChatContainer 控件
MultiAudioChatContainer对应上图中2标注的控件,它主要做了以下几件事情:
(1)在初始化时,加入聊天室:通过调用IMultimediaManager的ChatGroupEntrance属性的Join方法。
(2)使用FlowLayoutPanel将聊天室中每个成员对应的SpeakerPanel罗列出来。
(3)当有成员加入或退出聊天室时(对应ChatGroup的SomeoneJoin和SomeoneExit事件),动态添加或移除对应的SpeakerPanel实例。
(4)通过CheckBox将自己设备(麦克风和扬声器)的控制权暴露出来。我们可以启用或禁用我们自己的麦克风或扬声器。
(5)注意,其提供了Close方法,这意味着,在关闭包含了该控件的宿主窗体时,要调用其Close方法以释放其内部持有的麦克风连接器等资源。
在完成MultiAudioChatContainer后,我们这个聊天室的核心就差不多了。接下来就是弄个主窗体,然后把MultiAudioChatContainer拖上去,初始化IMultimediaManager,并传递给MultiAudioChatContainer就大功告成了。
三. 源码下载
上面只是讲了实现多人语音聊天室中的几个重点,并不全面,大家下载下面的源码可以更深入的研究。
最后,跟大家说说部署的步骤:
(1)将服务端部署在一台机器上,启动服务端。
(2)修改客户端配置文件中的ServerIP为刚才服务器的IP。
(3)在多台机器上运行客户端,以不同的帐号登录到同一个房间(如默认的R1000)。
(4)如此,多个用户就处于同一个聊天室进行语音聊天了。
敬请了解: