作者: Matthew Inkawhich
本教程将介绍使用PyTorch的Hybrid Frontend将序列到序列模型转换为Torch脚本的过程。我们将转换的模型是Chatbot教程中的chatbot模型 。您可以将本教程视为Chatbot教程的“第2部分”并部署您自己的预训练模型,或者您可以从本文档开始并使用我们托管的预训练模型。在后一种情况下,您可以参考原始的Chatbot教程,以获取有关数据预处理,模型理论和定义以及模型培训的详细信息。
什么是混合前端( HYBRID FRONTEND)?
在基于深度学习的项目的研究和开发阶段,使用pytorch的eager模式进行交互是有利的。这使用户能够编写熟悉的惯用Python,允许使用Python数据结构,控制流操作,打印语句和调试实用程序。虽然eager模式是研究和实验应用程序的有益工具,但是当需要在生产环境中部署模型时,需要一个静态图表示(graph-based model representation)是非常有益的。静态图表示允许进行优化,例如无序执行,以及针对高度优化的硬件体系结构的能力。此外,基于图形的表示使框架无关模型导出成为可能。PyTorch提供了将eager模式代码逐步转换为Torch Script的机制,Torch Script是一个静态可分析且可优化的Python子集,Torch使用它来独立于Python运行时表示深度学习程序。
用于将eager模式的PyTorch程序转换为Torch Script的API可在torch.jit模块中找到。该模块有两种核心模式,用于将热切模式模型转换为Torch Script图形表示:tracing和scripting。该torch.jit.trace函数采用模块或函数以及一组示例输入。然后,它在tracing遇到的计算步骤时通过函数或模块运行示例输入,并输出执行tracing操作的基于图形的函数。tracing非常适用于不涉及数据相关控制流的简单模块和功能,例如标准卷积神经网络(CNN)。但是,如果tracing具有依赖于数据的if语句和循环的函数,则仅记录沿示例输入所采用的执行路径调用的操作。换句话说,不捕获控制流本身。为了转换包含依赖于数据的控制流的模块和函数,提供了一种scripting机制。scripting显式将模块或功能代码转换为Torch Script,包括所有可能的控制流路径。要使用scripting模式,请确保从torch.jit.ScriptModule基类继承(而不是torch.nn.Module)并向torch.jit.script Python函数添加装饰器或torch.jit.script_method装饰器到你的模块的方法。使用scripting的一个警告是它只支持Python的受限子集。有关支持的功能的所有详细信息,请参阅Torch Script language reference。为了提供最大的灵活性,可以组合Torch Script 来表示整个程序,并且可以逐步应用这些技术。
工作流程
致谢
本教程的灵感来自以下来源:
Yuan-Kuei Wu的pytorch-chatbot实现:/ywk991112/pytorch-chatbotSean Robertson的实用pytorch seq2seq翻译示例:/spro/practical-pytorch/tree/master/seq2seq-translationFloydHub的康奈尔电影语料库预处理代码:/floydhub/textutil-preprocess-cornell-movie-corpus
准备环境
首先,我们将导入所需的模块并设置一些常量。如果您打算使用自己的模型,请确保 MAX_LENGTH正确设置常量。作为提醒,此常量定义训练期间允许的最大句子长度以及模型能够生成的最大长度输出。
from __future__ import absolute_importfrom __future__ import divisionfrom __future__ import print_functionfrom __future__ import unicode_literalsimport torchimport torch.nn as nnimport torch.nn.functional as Fimport reimport osimport unicodedataimport numpy as npdevice = torch.device("cpu")MAX_LENGTH = 10 # Maximum sentence length# Default word tokensPAD_token = 0 # Used for padding short sentencesSOS_token = 1 # Start-of-sentence tokenEOS_token = 2 # End-of-sentence token
模型概述
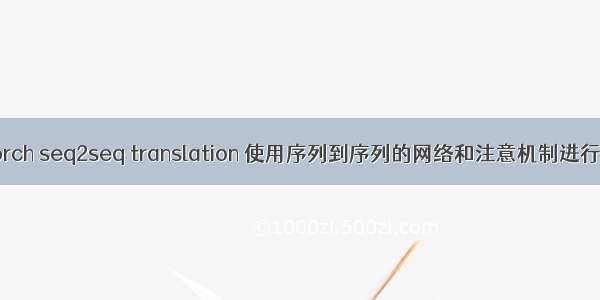
如上所述,我们使用的模型是序列到序列(seq2seq)模型。这种类型的模型用于我们的输入是可变长度序列的情况,并且我们的输出也是可变长度序列,其不一定是输入的一对一映射。seq2seq模型由两个协同工作的递归神经网络(RNN)组成:编码器和解码器。
图片来源:https: //jeddy92.github.io/JEddy92.github.io/ts_seq2seq_intro/
编码器Encoder
编码器RNN一次迭代输入语句一个token(例如,字),在每个时间步输出“ 输出”矢量和“隐藏状态”矢量。然后将隐藏状态向量传递到下一个时间步,同时记录输出向量。编码器将其在序列中的每个点处看到的上下文转换为高维空间中的一组点,解码器将使用该点来为给定任务生成有意义的输出。
解码器Decoder
解码器RNN以token-by-token fashion生成响应语句。它使用编码器的上下文向量和内部隐藏状态来生成序列中的下一个字。它继续生成单词,直到它输出EOS_token,表示句子的结尾。我们在解码器中使用注意机制来帮助它在生成输出时“注意”输入的某些部分。对于我们的模型,我们实现了Luong等人的“全局关注”(“Global attention”)模块,并将其用作我们的解码模型中的子模块。
数据处理
虽然我们的模型在概念上处理sequences of tokens,但实际上它们处理的数字与所有机器学习模型一样。在这种情况下,模型词汇表中的每个单词(在训练之前建立)都映射到整数索引。我们使用一个Voc对象来包含从单词到索引的映射,以及词汇表中单词的总数。我们将在运行模型之前加载对象。
此外,为了使我们能够运行评估,我们必须提供一个处理字符串输入的工具。该normalizeString函数将字符串中的所有字符转换为小写,并删除所有非字母字符。该indexesFromSentence函数采用单词的句子并返回相应的单词索引序列。
class Voc:def __init__(self, name):self.name = nameself.trimmed = Falseself.word2index = {}self.word2count = {}self.index2word = {PAD_token: "PAD", SOS_token: "SOS", EOS_token: "EOS"}self.num_words = 3 # Count SOS, EOS, PADdef addSentence(self, sentence):for word in sentence.split(' '):self.addWord(word)def addWord(self, word):if word not in self.word2index:self.word2index[word] = self.num_wordsself.word2count[word] = 1self.index2word[self.num_words] = wordself.num_words += 1else:self.word2count[word] += 1# Remove words below a certain count thresholddef trim(self, min_count):if self.trimmed:returnself.trimmed = Truekeep_words = []for k, v in self.word2count.items():if v >= min_count:keep_words.append(k)print('keep_words {} / {} = {:.4f}'.format(len(keep_words), len(self.word2index), len(keep_words) / len(self.word2index)))# Reinitialize dictionariesself.word2index = {}self.word2count = {}self.index2word = {PAD_token: "PAD", SOS_token: "SOS", EOS_token: "EOS"}self.num_words = 3 # Count default tokensfor word in keep_words:self.addWord(word)# Lowercase and remove non-letter charactersdef normalizeString(s):s = s.lower()s = re.sub(r"([.!?])", r" \1", s)s = re.sub(r"[^a-zA-Z.!?]+", r" ", s)return s# Takes string sentence, returns sentence of word indexesdef indexesFromSentence(voc, sentence):return [voc.word2index[word] for word in sentence.split(' ')] + [EOS_token]
定义编码器
我们使用torch.nn.GRU我们提供一批句子(单词嵌入的向量)的模块来实现我们的编码器的RNN,并且它在内部迭代通过句子一次一个token来计算隐藏状态。我们将此模块初始化为双向的,这意味着我们有两个独立的GRU:一个按时间顺序迭代序列,另一个以相反的顺序迭代。我们最终返回这两个GRU输出的总和。由于我们的模型是使用批处理训练的,因此我们的EncoderRNN模型 forward函数需要填充输入批处理。对于批量变长句子,我们允许句子中最多MAX_LENGTH个标记,并且批处理中所有小于MAX_LENGTH的句子 最后用我们专用的PAD_token 填充token。要使用带有PyTorch RNN模块的填充批次,我们必须使用torch.nn.utils.rnn.pack_padded_sequence 和torch.nn.utils.rnn.pad_packed_sequence数据转换包装前向调用。请注意,该forward函数还采用一个input_lengths列表,其中包含批处理中每个句子的长度。torch.nn.utils.rnn.pack_padded_sequence填充时,该函数使用此输入。
HYBRID FRONTEND笔记:
由于编码器的forward功能不包含任何与数据相关的控制流,因此我们将tracing将其转换为scripting模式。tracing时,我们可以保留模块定义。在进行评估之前,我们将在本文档末尾初始化所有模型。
class EncoderRNN(nn.Module):def __init__(self, hidden_size, embedding, n_layers=1, dropout=0):super(EncoderRNN, self).__init__()self.n_layers = n_layersself.hidden_size = hidden_sizeself.embedding = embedding# Initialize GRU; the input_size and hidden_size params are both set to 'hidden_size'# because our input size is a word embedding with number of features == hidden_sizeself.gru = nn.GRU(hidden_size, hidden_size, n_layers,dropout=(0 if n_layers == 1 else dropout), bidirectional=True)def forward(self, input_seq, input_lengths, hidden=None):# Convert word indexes to embeddingsembedded = self.embedding(input_seq)# Pack padded batch of sequences for RNN modulepacked = torch.nn.utils.rnn.pack_padded_sequence(embedded, input_lengths)# Forward pass through GRUoutputs, hidden = self.gru(packed, hidden)# Unpack paddingoutputs, _ = torch.nn.utils.rnn.pad_packed_sequence(outputs)# Sum bidirectional GRU outputsoutputs = outputs[:, :, :self.hidden_size] + outputs[:, : ,self.hidden_size:]# Return output and final hidden statereturn outputs, hidden
定义解码器的Attention module
接下来,我们将定义我们的注意模块(Attn)。请注意,此模块将用作解码器模型中的子模块。Luong等。考虑各种“得分函数”,其取当前解码器RNN输出和整个编码器输出,并返回注意“能量”。该注意能量张量与编码器输出的大小相同,并且这两者最终相乘,产生加权张量,其最大值表示在解码的特定时间步骤中查询句子的最重要部分。
# Luong attention layerclass Attn(torch.nn.Module):def __init__(self, method, hidden_size):super(Attn, self).__init__()self.method = methodif self.method not in ['dot', 'general', 'concat']:raise ValueError(self.method, "is not an appropriate attention method.")self.hidden_size = hidden_sizeif self.method == 'general':self.attn = torch.nn.Linear(self.hidden_size, hidden_size)elif self.method == 'concat':self.attn = torch.nn.Linear(self.hidden_size * 2, hidden_size)self.v = torch.nn.Parameter(torch.FloatTensor(hidden_size))def dot_score(self, hidden, encoder_output):return torch.sum(hidden * encoder_output, dim=2)def general_score(self, hidden, encoder_output):energy = self.attn(encoder_output)return torch.sum(hidden * energy, dim=2)def concat_score(self, hidden, encoder_output):energy = self.attn(torch.cat((hidden.expand(encoder_output.size(0), -1, -1), encoder_output), 2)).tanh()return torch.sum(self.v * energy, dim=2)def forward(self, hidden, encoder_outputs):# Calculate the attention weights (energies) based on the given methodif self.method == 'general':attn_energies = self.general_score(hidden, encoder_outputs)elif self.method == 'concat':attn_energies = self.concat_score(hidden, encoder_outputs)elif self.method == 'dot':attn_energies = self.dot_score(hidden, encoder_outputs)# Transpose max_length and batch_size dimensionsattn_energies = attn_energies.t()# Return the softmax normalized probability scores (with added dimension)return F.softmax(attn_energies, dim=1).unsqueeze(1)
定义解码器
与此类似EncoderRNN,我们将torch.nn.GRU模块用于解码器的RNN。但是,这次我们使用单向GRU。重要的是要注意,与编码器不同,我们将一次向解码器RNN提供一个字。我们首先获取当前单词的嵌入并应用 辍学。接下来,我们将嵌入和最后隐藏状态转发到GRU并获得当前GRU输出和隐藏状态。然后我们使用我们的Attn 模块作为一个层来获得注意权重,我们将其乘以编码器的输出以获得我们参加的编码器输出。我们使用这个有人值守的编码器输出context张量,表示加权和,表示编码器输出的哪些部分需要注意。从这里开始,我们使用线性层和softmax标准化来选择输出序列中的下一个字。
HYBRID FRONTEND笔记:
与EncoderRNN此类似,此模块不包含任何数据相关的控制流。因此,在初始化并加载其参数后,我们可以再次使用 tracing将此模型转换为Torch Script。
class LuongAttnDecoderRNN(nn.Module):def __init__(self, attn_model, embedding, hidden_size, output_size, n_layers=1, dropout=0.1):super(LuongAttnDecoderRNN, self).__init__()# Keep for referenceself.attn_model = attn_modelself.hidden_size = hidden_sizeself.output_size = output_sizeself.n_layers = n_layersself.dropout = dropout# Define layersself.embedding = embeddingself.embedding_dropout = nn.Dropout(dropout)self.gru = nn.GRU(hidden_size, hidden_size, n_layers, dropout=(0 if n_layers == 1 else dropout))self.concat = nn.Linear(hidden_size * 2, hidden_size)self.out = nn.Linear(hidden_size, output_size)self.attn = Attn(attn_model, hidden_size)def forward(self, input_step, last_hidden, encoder_outputs):# Note: we run this one step (word) at a time# Get embedding of current input wordembedded = self.embedding(input_step)embedded = self.embedding_dropout(embedded)# Forward through unidirectional GRUrnn_output, hidden = self.gru(embedded, last_hidden)# Calculate attention weights from the current GRU outputattn_weights = self.attn(rnn_output, encoder_outputs)# Multiply attention weights to encoder outputs to get new "weighted sum" context vectorcontext = attn_weights.bmm(encoder_outputs.transpose(0, 1))# Concatenate weighted context vector and GRU output using Luong eq. 5rnn_output = rnn_output.squeeze(0)context = context.squeeze(1)concat_input = torch.cat((rnn_output, context), 1)concat_output = torch.tanh(self.concat(concat_input))# Predict next word using Luong eq. 6output = self.out(concat_output)output = F.softmax(output, dim=1)# Return output and final hidden statereturn output, hidden
定义评估
贪婪的搜索解码器
与chatbot教程一样,我们使用GreedySearchDecoder模块来促进实际的解码过程。该模块具有训练的编码器和解码器模型作为属性,并且驱动编码输入语句(字索引的矢量)的过程,并且一次迭代地解码输出响应序列一个字(字索引)。
对输入序列进行编码非常简单:只需将整个序列张量及其相应的长度向量转发给 encoder。重要的是要注意,该模块一次只处理一个输入序列,而不是批量序列。因此,当常数1用于声明张量大小时,这对应于批量大小1.为了解码给定的解码器输出,我们必须迭代地向前通过我们的解码器模型,该模型输出对应于每个的概率的softmax分数。单词是解码序列中正确的下一个单词。我们初始化为 decoder_input包含SOS_token的张量。每次经过之后decoder,我们贪婪地将具有最高softmax概率的单词追加到decoded_words列表中。我们也将这个词用作decoder_input下一次迭代。如果decoded_words列表已达到 MAX_LENGTH的长度或者如果预测的字是EOS_token,则解码过程终止。
HYBRID FRONTEND笔记:
该forward模块的方法涉及迭代范围[0,max_length)当一次一个字地解码输出序列时。因此,我们应该使用脚本将此模块转换为Torch Script。与我们可以tracing编码器和解码器模型不同,我们必须对GreedySearchDecoder模块进行一些必要的更改 ,以便无错误地初始化对象。换句话说,我们必须确保我们的模块遵守脚本机制的规则,并且不使用Torch脚本包含的Python子集之外的任何语言功能。
为了了解可能需要的一些操作,我们将GreedySearchDecoder讨论chatbot教程的实现与我们在下面的单元格中使用的实现之间的差异。请注意,以红色突出显示的行是从原始实现中删除的行,以绿色突出显示的行是新的。
变化:
nn.Module - > torch.jit.ScriptModule
为了在模块上使用PyTorch的脚本机制,该模块必须继承自- --torch.jit.ScriptModule。-添加decoder_n_layers到构造函数参数中
这种变化源于这样一个事实:我们传递给这个模块的编码器和解码器模型将是TracedModule(不是Module)的child。因此,我们无法访问解码器的层数decoder.n_layers。相反,我们计划这样做,并在模块构建期间传递此值。将新属性存储为常量
在最初的实现中,我们可以自由地在我们GreedySearchDecoder的 forward方法中使用来自周围(全局)范围的变量。但是,现在我们正在使用脚本,我们没有这种自由,因为脚本的假设是我们不一定能抓住Python对象,特别是在导出时。一个简单的解决方案是将这些值从全局范围作为属性存储到构造函数中的模块,并将它们添加到一个特殊的列表中,__constants__以便在构造forward方法中的图形时将它们用作文字值。这种用法的一个例子是在第19行,其中我们不使用device和SOS_token全局值,而是使用常量属性self._device和 self._SOS_token。
将torch.jit.script_method装饰器添加到forward 方法中
添加这个装饰器让JIT编译器知道它正在装饰的函数应该编写脚本。实施forward方法参数的类型
默认情况下,Torch脚本函数的所有参数都假定为Tensor。如果我们需要传递不同类型的参数,我们可以使用PEP 3107中引入的函数类型注释。此外,可以使用MyPy样式的注释声明不同类型的参数(请参阅 doc)。改变初始化 decoder_input
在最初的实现中,我们初始化了 decoder_input张量torch.LongTensor([[SOS_token]])。编写脚本时,我们不允许以这样的文字方式初始化张量。相反,我们可以使用明确的火炬函数初始化张量,例如torch.ones。在这种情况下,我们可以decoder_input通过将1乘以存储在常量中的SOS_token值来轻松复制标量张量 self._SOS_token。
class GreedySearchDecoder(torch.jit.ScriptModule):def __init__(self, encoder, decoder, decoder_n_layers):super(GreedySearchDecoder, self).__init__()self.encoder = encoderself.decoder = decoderself._device = deviceself._SOS_token = SOS_tokenself._decoder_n_layers = decoder_n_layers__constants__ = ['_device', '_SOS_token', '_decoder_n_layers']@torch.jit.script_methoddef forward(self, input_seq : torch.Tensor, input_length : torch.Tensor, max_length : int):# Forward input through encoder modelencoder_outputs, encoder_hidden = self.encoder(input_seq, input_length)# Prepare encoder's final hidden layer to be first hidden input to the decoderdecoder_hidden = encoder_hidden[:self._decoder_n_layers]# Initialize decoder input with SOS_tokendecoder_input = torch.ones(1, 1, device=self._device, dtype=torch.long) * self._SOS_token# Initialize tensors to append decoded words toall_tokens = torch.zeros([0], device=self._device, dtype=torch.long)all_scores = torch.zeros([0], device=self._device)# Iteratively decode one word token at a timefor _ in range(max_length):# Forward pass through decoderdecoder_output, decoder_hidden = self.decoder(decoder_input, decoder_hidden, encoder_outputs)# Obtain most likely word token and its softmax scoredecoder_scores, decoder_input = torch.max(decoder_output, dim=1)# Record token and scoreall_tokens = torch.cat((all_tokens, decoder_input), dim=0)all_scores = torch.cat((all_scores, decoder_scores), dim=0)# Prepare current token to be next decoder input (add a dimension)decoder_input = torch.unsqueeze(decoder_input, 0)# Return collections of word tokens and scoresreturn all_tokens, all_scores
评估输入
接下来,我们定义一些用于评估输入的函数。该evaluate 函数采用规范化的字符串句子,将其处理为其相应字索引的张量(批量大小为1),并将此张量传递给GreedySearchDecoder调用searcher处理编码/解码过程的实例。搜索器返回输出词索引向量和对应于每个解码词token的softmax分数的分数张量。最后一步是使用将每个单词索引转换回其字符串表示voc.index2word。
我们还定义了两个用于评估输入句子的函数。该 evaluateInput功能提示用户输入,并对其进行评估。在用户输入“q”或“退出”之前,它将继续请求另一个输入。
该evaluateExample函数只是将一个字符串输入句子作为参数,对其进行规范化,对其进行求值,然后打印响应。
def evaluate(encoder, decoder, searcher, voc, sentence, max_length=MAX_LENGTH):### Format input sentence as a batch# words -> indexesindexes_batch = [indexesFromSentence(voc, sentence)]# Create lengths tensorlengths = torch.tensor([len(indexes) for indexes in indexes_batch])# Transpose dimensions of batch to match models' expectationsinput_batch = torch.LongTensor(indexes_batch).transpose(0, 1)# Use appropriate deviceinput_batch = input_batch.to(device)lengths = lengths.to(device)# Decode sentence with searchertokens, scores = searcher(input_batch, lengths, max_length)# indexes -> wordsdecoded_words = [voc.index2word[token.item()] for token in tokens]return decoded_words# Evaluate inputs from user input (stdin)def evaluateInput(encoder, decoder, searcher, voc):input_sentence = ''while(1):try:# Get input sentenceinput_sentence = input('> ')# Check if it is quit caseif input_sentence == 'q' or input_sentence == 'quit': break# Normalize sentenceinput_sentence = normalizeString(input_sentence)# Evaluate sentenceoutput_words = evaluate(encoder, decoder, searcher, voc, input_sentence)# Format and print response sentenceoutput_words[:] = [x for x in output_words if not (x == 'EOS' or x == 'PAD')]print('Bot:', ' '.join(output_words))except KeyError:print("Error: Encountered unknown word.")# Normalize input sentence and call evaluate()def evaluateExample(sentence, encoder, decoder, searcher, voc):print("> " + sentence)# Normalize sentenceinput_sentence = normalizeString(sentence)# Evaluate sentenceoutput_words = evaluate(encoder, decoder, searcher, voc, input_sentence)output_words[:] = [x for x in output_words if not (x == 'EOS' or x == 'PAD')]print('Bot:', ' '.join(output_words))
加载预训练参数
好的,是时候加载我们的模型了!
使用托管模型
要加载托管模型:
在这里下载模型。将loadFilename变量设置为下载的检查点文件的路径。保留该行未注释,因为托管模型是在CPU上训练的。checkpoint = torch.load(loadFilename)
使用您自己的模型
要加载您自己的预训练模型:
将loadFilename变量设置为要加载的检查点文件的路径。请注意,如果您是用于保存从聊天机器人教程模型中的约定,这可能涉及改变model_name,encoder_n_layers,decoder_n_layers, hidden_size,和checkpoint_iter(因为这些值在模型路径中使用)。如果您在CPU上训练模型,请确保使用该线打开检查点。如果您在GPU上训练模型并在CPU上运行本教程,请取消注释该 行。checkpoint = torch.load(loadFilename)checkpoint = torch.load(loadFilename, map_location=torch.device(‘cpu’))
HYBRID FRONTEND笔记:
请注意,我们像往常一样初始化并将参数加载到编码器和解码器模型中。此外,我们必须调用.to(device)设置模型的设备选项,并在跟踪模型之前.eval()将丢失层设置为测试模式。对象不继承或方法。TracedModuletoeval
save_dir = os.path.join("data", "save")corpus_name = "cornell movie-dialogs corpus"# Configure modelsmodel_name = 'cb_model'attn_model = 'dot'#attn_model = 'general'#attn_model = 'concat'hidden_size = 500encoder_n_layers = 2decoder_n_layers = 2dropout = 0.1batch_size = 64# If you're loading your own model# Set checkpoint to load fromcheckpoint_iter = 4000# loadFilename = os.path.join(save_dir, model_name, corpus_name,# '{}-{}_{}'.format(encoder_n_layers, decoder_n_layers, hidden_size),# '{}_checkpoint.tar'.format(checkpoint_iter))# If you're loading the hosted modelloadFilename = 'data/4000_checkpoint.tar'# Load model# Force CPU device options (to match tensors in this tutorial)checkpoint = torch.load(loadFilename, map_location=torch.device('cpu'))encoder_sd = checkpoint['en']decoder_sd = checkpoint['de']encoder_optimizer_sd = checkpoint['en_opt']decoder_optimizer_sd = checkpoint['de_opt']embedding_sd = checkpoint['embedding']voc = Voc(corpus_name)voc.__dict__ = checkpoint['voc_dict']print('Building encoder and decoder ...')# Initialize word embeddingsembedding = nn.Embedding(voc.num_words, hidden_size)embedding.load_state_dict(embedding_sd)# Initialize encoder & decoder modelsencoder = EncoderRNN(hidden_size, embedding, encoder_n_layers, dropout)decoder = LuongAttnDecoderRNN(attn_model, embedding, hidden_size, voc.num_words, decoder_n_layers, dropout)# Load trained model paramsencoder.load_state_dict(encoder_sd)decoder.load_state_dict(decoder_sd)# Use appropriate deviceencoder = encoder.to(device)decoder = decoder.to(device)# Set dropout layers to eval modeencoder.eval()decoder.eval()print('Models built and ready to go!')
输出:
Building encoder and decoder ...Models built and ready to go!
将模型转换为Torch scripting
编码器
如前所述,要将编码器模型转换为Torch脚本,我们使用跟踪。跟踪任何模块需要通过模型的forward方法运行示例输入并跟踪数据遇到的计算图。编码器模型采用输入序列和相应的长度张量。因此,我们创建一个示例输入序列张量test_seq,它具有适当的大小(MAX_LENGTH,1),包含适当范围内的数字 [0,voc.num_words),并且是适当的类型(int64)。我们还创建了一个test_seq_length标量,它实际上包含了对应于多少单词的值test_seq。下一步是使用该torch.jit.trace函数来跟踪模型。请注意,我们传递的第一个参数是我们要跟踪的模块,第二个参数是模块forward方法的参数元组 。
解码器
我们执行与编码器相同的跟踪解码器的过程。请注意,我们在traced_encoder的一组随机输入上调用前向来获取解码器所需的输出。这不是必需的,因为我们也可以简单地制造具有正确形状,类型和值范围的张量。这种方法是可行的,因为在我们的情况下,我们对张量的值没有任何约束,因为我们没有任何可能在超出范围的输入上发生故障的操作。
GreedySearchDecoder
回想一下,由于存在依赖于数据的控制流,我们编写了搜索模块的脚本。在脚本编写的情况下,我们通过添加装饰器并确保实现符合脚本规则来预先进行转换工作。我们初始化脚本搜索器的方式与初始化非脚本化变体的方式相同。
### Convert encoder model# Create artificial inputstest_seq = torch.LongTensor(MAX_LENGTH, 1).random_(0, voc.num_words)test_seq_length = torch.LongTensor([test_seq.size()[0]])# Trace the modeltraced_encoder = torch.jit.trace(encoder, (test_seq, test_seq_length))### Convert decoder model# Create and generate artificial inputstest_encoder_outputs, test_encoder_hidden = traced_encoder(test_seq, test_seq_length)test_decoder_hidden = test_encoder_hidden[:decoder.n_layers]test_decoder_input = torch.LongTensor(1, 1).random_(0, voc.num_words)# Trace the modeltraced_decoder = torch.jit.trace(decoder, (test_decoder_input, test_decoder_hidden, test_encoder_outputs))### Initialize searcher modulescripted_searcher = GreedySearchDecoder(traced_encoder, traced_decoder, decoder.n_layers)
打印图表
现在我们的模型采用Torch Script形式,我们可以打印每个模型的图形,以确保我们适当地捕获计算图形。因为我们scripted_searcher包含了我们traced_encoder和 traced_decoder这些图将内嵌打印。
print('scripted_searcher graph:\n', scripted_searcher.graph)
输出:
scripted_searcher graph:graph(%input_seq : Tensor%input_length : Tensor%max_length : int%3 : Tensor%4 : Tensor%5 : Tensor%6 : Tensor%7 : Tensor%8 : Tensor%9 : Tensor%10 : Tensor%11 : Tensor%12 : Tensor%13 : Tensor%14 : Tensor%15 : Tensor%16 : Tensor%17 : Tensor%18 : Tensor%19 : Tensor%118 : Tensor%119 : Tensor%120 : Tensor%121 : Tensor%122 : Tensor%123 : Tensor%124 : Tensor%125 : Tensor%126 : Tensor%127 : Tensor%128 : Tensor%129 : Tensor%130 : Tensor) {%58 : int = prim::Constant[value=9223372036854775807](), scope: EncoderRNN%53 : float = prim::Constant[value=0](), scope: EncoderRNN%43 : float = prim::Constant[value=0.1](), scope: EncoderRNN/GRU[gru]%42 : int = prim::Constant[value=2](), scope: EncoderRNN/GRU[gru]%41 : bool = prim::Constant[value=1](), scope: EncoderRNN/GRU[gru]%36 : int = prim::Constant[value=6](), scope: EncoderRNN/GRU[gru]%34 : int = prim::Constant[value=500](), scope: EncoderRNN/GRU[gru]%25 : int = prim::Constant[value=4](), scope: EncoderRNN%24 : Device = prim::Constant[value="cpu"](), scope: EncoderRNN%21 : bool = prim::Constant[value=0](), scope: EncoderRNN/Embedding[embedding]%20 : int = prim::Constant[value=-1](), scope: EncoderRNN/Embedding[embedding]%90 : int = prim::Constant[value=0]()%94 : int = prim::Constant[value=1]()%input.7 : Float(10, 1, 500) = aten::embedding(%3, %input_seq, %20, %21, %21), scope: EncoderRNN/Embedding[embedding]%lengths : Long(1) = aten::to(%input_length, %24, %25, %21, %21), scope: EncoderRNN%input.1 : Float(10, 500), %batch_sizes : Long(10) = aten::_pack_padded_sequence(%input.7, %lengths, %21), scope: EncoderRNN%35 : int[] = prim::ListConstruct(%25, %94, %34), scope: EncoderRNN/GRU[gru]%hx : Float(4, 1, 500) = aten::zeros(%35, %36, %90, %24), scope: EncoderRNN/GRU[gru]%40 : Tensor[] = prim::ListConstruct(%4, %5, %6, %7, %8, %9, %10, %11, %12, %13, %14, %15, %16, %17, %18, %19), scope: EncoderRNN/GRU[gru]%46 : Float(10, 1000), %encoder_hidden : Float(4, 1, 500) = aten::gru(%input.1, %batch_sizes, %hx, %40, %41, %42, %43, %21, %41), scope: EncoderRNN/GRU[gru]%49 : int = aten::size(%batch_sizes, %90), scope: EncoderRNN%max_seq_length : Long() = prim::NumToTensor(%49), scope: EncoderRNN%51 : int = prim::Int(%max_seq_length), scope: EncoderRNN%outputs : Float(10, 1, 1000), %55 : Long(1) = aten::_pad_packed_sequence(%46, %batch_sizes, %21, %53, %51), scope: EncoderRNN%60 : Float(10, 1, 1000) = aten::slice(%outputs, %90, %90, %58, %94), scope: EncoderRNN%65 : Float(10, 1, 1000) = aten::slice(%60, %94, %90, %58, %94), scope: EncoderRNN%70 : Float(10, 1!, 500) = aten::slice(%65, %42, %90, %34, %94), scope: EncoderRNN%75 : Float(10, 1, 1000) = aten::slice(%outputs, %90, %90, %58, %94), scope: EncoderRNN%80 : Float(10, 1, 1000) = aten::slice(%75, %94, %90, %58, %94), scope: EncoderRNN%85 : Float(10, 1!, 500) = aten::slice(%80, %42, %34, %58, %94), scope: EncoderRNN%encoder_outputs : Float(10, 1, 500) = aten::add(%70, %85, %94), scope: EncoderRNN%decoder_hidden.1 : Tensor = aten::slice(%encoder_hidden, %90, %90, %42, %94)%98 : int[] = prim::ListConstruct(%94, %94)%100 : Tensor = aten::ones(%98, %25, %90, %24)%decoder_input.1 : Tensor = aten::mul(%100, %94)%103 : int[] = prim::ListConstruct(%90)%all_tokens.1 : Tensor = aten::zeros(%103, %25, %90, %24)%108 : int[] = prim::ListConstruct(%90)%all_scores.1 : Tensor = aten::zeros(%108, %36, %90, %24)%all_scores : Tensor, %all_tokens : Tensor, %decoder_hidden : Tensor, %decoder_input : Tensor = prim::Loop(%max_length, %41, %all_scores.1, %all_tokens.1, %decoder_hidden.1, %decoder_input.1)block0(%114 : int, %188 : Tensor, %184 : Tensor, %116 : Tensor, %115 : Tensor) {%input.2 : Float(1, 1, 500) = aten::embedding(%118, %115, %20, %21, %21), scope: LuongAttnDecoderRNN/Embedding[embedding]%input.3 : Float(1, 1, 500) = aten::dropout(%input.2, %43, %21), scope: LuongAttnDecoderRNN/Dropout[embedding_dropout]%138 : Tensor[] = prim::ListConstruct(%119, %120, %121, %122, %123, %124, %125, %126), scope: LuongAttnDecoderRNN/GRU[gru]%hidden : Float(1, 1, 500), %decoder_hidden.2 : Float(2, 1, 500) = aten::gru(%input.3, %116, %138, %41, %42, %43, %21, %21, %21), scope: LuongAttnDecoderRNN/GRU[gru]%147 : Float(10, 1, 500) = aten::mul(%hidden, %encoder_outputs), scope: LuongAttnDecoderRNN/Attn[attn]%149 : int[] = prim::ListConstruct(%42), scope: LuongAttnDecoderRNN/Attn[attn]%attn_energies : Float(10, 1) = aten::sum(%147, %149, %21), scope: LuongAttnDecoderRNN/Attn[attn]%input.4 : Float(1!, 10) = aten::t(%attn_energies), scope: LuongAttnDecoderRNN/Attn[attn]%154 : Float(1, 10) = aten::softmax(%input.4, %94), scope: LuongAttnDecoderRNN/Attn[attn]%attn_weights : Float(1, 1, 10) = aten::unsqueeze(%154, %94), scope: LuongAttnDecoderRNN/Attn[attn]%159 : Float(1!, 10, 500) = aten::transpose(%encoder_outputs, %90, %94), scope: LuongAttnDecoderRNN%context.1 : Float(1, 1, 500) = aten::bmm(%attn_weights, %159), scope: LuongAttnDecoderRNN%rnn_output : Float(1, 500) = aten::squeeze(%hidden, %90), scope: LuongAttnDecoderRNN%context : Float(1, 500) = aten::squeeze(%context.1, %94), scope: LuongAttnDecoderRNN%165 : Tensor[] = prim::ListConstruct(%rnn_output, %context), scope: LuongAttnDecoderRNN%input.5 : Float(1, 1000) = aten::cat(%165, %94), scope: LuongAttnDecoderRNN%168 : Float(1000!, 500!) = aten::t(%127), scope: LuongAttnDecoderRNN/Linear[concat]%171 : Float(1, 500) = aten::addmm(%128, %input.5, %168, %94, %94), scope: LuongAttnDecoderRNN/Linear[concat]%input.6 : Float(1, 500) = aten::tanh(%171), scope: LuongAttnDecoderRNN%173 : Float(500!, 7826!) = aten::t(%129), scope: LuongAttnDecoderRNN/Linear[out]%input : Float(1, 7826) = aten::addmm(%130, %input.6, %173, %94, %94), scope: LuongAttnDecoderRNN/Linear[out]%decoder_output : Float(1, 7826) = aten::softmax(%input, %94), scope: LuongAttnDecoderRNN%decoder_scores : Tensor, %decoder_input.2 : Tensor = aten::max(%decoder_output, %94, %21)%186 : Tensor[] = prim::ListConstruct(%184, %decoder_input.2)%all_tokens.2 : Tensor = aten::cat(%186, %90)%190 : Tensor[] = prim::ListConstruct(%188, %decoder_scores)%all_scores.2 : Tensor = aten::cat(%190, %90)%decoder_input.3 : Tensor = aten::unsqueeze(%decoder_input.2, %90)-> (%41, %all_scores.2, %all_tokens.2, %decoder_hidden.2, %decoder_input.3)}%198 : (Tensor, Tensor) = prim::TupleConstruct(%all_tokens, %all_scores)return (%198);}
运行评估
最后,我们将使用Torch Script模型对聊天机器人模型进行评估。如果转换正确,模型的行为将与其热切模式表示完全相同。
默认情况下,我们会评估一些常见的查询语句。如果您想自己与机器人聊天,请取消注释该evaluateInput行并给它一个旋转。
# Evaluate examplessentences = ["hello", "what's up?", "who are you?", "where am I?", "where are you from?"]for s in sentences:evaluateExample(s, traced_encoder, traced_decoder, scripted_searcher, voc)# Evaluate your input#evaluateInput(traced_encoder, traced_decoder, scripted_searcher, voc)
输出:
> helloBot: hello .> what's up?Bot: i m going to get my car .> who are you?Bot: i m the owner .> where am I?Bot: in the house .> where are you from?Bot: south america .
保存模型
现在我们已成功将模型转换为Torch Script,我们将序列化它以用于非Python部署环境。为此,我们可以简单地保存我们的scripted_searcher模块,因为这是面向用户的界面,用于对聊天机器人模型进行推理。保存脚本模块时,请使用script_module.save(PATH)而不是torch.save(model,PATH)。
scripted_searcher.save("scripted_chatbot.pth")
下面是整个文档代码:
# -*- coding: utf-8 -*-"""Deploying a Seq2Seq Model with the Hybrid Frontend==================================================**Author:** `Matthew Inkawhich </MatthewInkawhich>`_"""####################################################################### This tutorial will walk through the process of transitioning a# sequence-to-sequence model to Torch Script using PyTorch’s Hybrid# Frontend. The model that we will convert is the chatbot model from the# `Chatbot tutorial </tutorials/beginner/chatbot_tutorial.html>`__. # You can either treat this tutorial as a “Part 2” to the Chatbot tutorial# and deploy your own pretrained model, or you can start with this# document and use a pretrained model that we host. In the latter case,# you can reference the original Chatbot tutorial for details# regarding data preprocessing, model theory and definition, and model# training.## What is the Hybrid Frontend?# ----------------------------## During the research and development phase of a deep learning-based# project, it is advantageous to interact with an **eager**, imperative# interface like PyTorch’s. This gives users the ability to write# familiar, idiomatic Python, allowing for the use of Python data# structures, control flow operations, print statements, and debugging# utilities. Although the eager interface is a beneficial tool for# research and experimentation applications, when it comes time to deploy# the model in a production environment, having a **graph**-based model# representation is very beneficial. A deferred graph representation# allows for optimizations such as out-of-order execution, and the ability# to target highly optimized hardware architectures. Also, a graph-based# representation enables framework-agnostic model exportation. PyTorch# provides mechanisms for incrementally converting eager-mode code into# Torch Script, a statically analyzable and optimizable subset of Python# that Torch uses to represent deep learning programs independently from# the Python runtime.## The API for converting eager-mode PyTorch programs into Torch Script is# found in the torch.jit module. This module has two core modalities for# converting an eager-mode model to a Torch Script graph representation:# **tracing** and **scripting**. The ``torch.jit.trace`` function takes a# module or function and a set of example inputs. It then runs the example# input through the function or module while tracing the computational# steps that are encountered, and outputs a graph-based function that# performs the traced operations. **Tracing** is great for straightforward# modules and functions that do not involve data-dependent control flow,# such as standard convolutional neural networks. However, if a function# with data-dependent if statements and loops is traced, only the# operations called along the execution route taken by the example input# will be recorded. In other words, the control flow itself is not# captured. To convert modules and functions containing data-dependent# control flow, a **scripting** mechanism is provided. Scripting# explicitly converts the module or function code to Torch Script,# including all possible control flow routes. To use script mode, be sure# to inherit from the the ``torch.jit.ScriptModule`` base class (instead# of ``torch.nn.Module``) and add a ``torch.jit.script`` decorator to your# Python function or a ``torch.jit.script_method`` decorator to your# module’s methods. The one caveat with using scripting is that it only# supports a restricted subset of Python. For all details relating to the# supported features, see the Torch Script `language# reference </docs/master/jit.html>`__. To provide the# maximum flexibility, the modes of Torch Script can be composed to# represent your whole program, and these techniques can be applied# incrementally.## .. figure:: /_static/img/chatbot/pytorch_workflow.png# :align: center# :alt: workflow######################################################################## Acknowledgements# ----------------## This tutorial was inspired by the following sources:## 1) Yuan-Kuei Wu’s pytorch-chatbot implementation:# /ywk991112/pytorch-chatbot## 2) Sean Robertson’s practical-pytorch seq2seq-translation example:# /spro/practical-pytorch/tree/master/seq2seq-translation## 3) FloydHub’s Cornell Movie Corpus preprocessing code:# /floydhub/textutil-preprocess-cornell-movie-corpus######################################################################## Prepare Environment# -------------------## First, we will import the required modules and set some constants. If# you are planning on using your own model, be sure that the# ``MAX_LENGTH`` constant is set correctly. As a reminder, this constant# defines the maximum allowed sentence length during training and the# maximum length output that the model is capable of producing.#from __future__ import absolute_importfrom __future__ import divisionfrom __future__ import print_functionfrom __future__ import unicode_literalsimport torchimport torch.nn as nnimport torch.nn.functional as Fimport reimport osimport unicodedataimport numpy as npdevice = torch.device("cpu")MAX_LENGTH = 10 # Maximum sentence length# Default word tokensPAD_token = 0 # Used for padding short sentencesSOS_token = 1 # Start-of-sentence tokenEOS_token = 2 # End-of-sentence token####################################################################### Model Overview# --------------## As mentioned, the model that we are using is a# `sequence-to-sequence </abs/1409.3215>`__ (seq2seq)# model. This type of model is used in cases when our input is a# variable-length sequence, and our output is also a variable length# sequence that is not necessarily a one-to-one mapping of the input. A# seq2seq model is comprised of two recurrent neural networks (RNNs) that# work cooperatively: an **encoder** and a **decoder**.## .. figure:: /_static/img/chatbot/seq2seq_ts.png# :align: center# :alt: model### Image source:# https://jeddy92.github.io/JEddy92.github.io/ts_seq2seq_intro/## Encoder# ~~~~~~~## The encoder RNN iterates through the input sentence one token# (e.g. word) at a time, at each time step outputting an “output” vector# and a “hidden state” vector. The hidden state vector is then passed to# the next time step, while the output vector is recorded. The encoder# transforms the context it saw at each point in the sequence into a set# of points in a high-dimensional space, which the decoder will use to# generate a meaningful output for the given task.## Decoder# ~~~~~~~## The decoder RNN generates the response sentence in a token-by-token# fashion. It uses the encoder’s context vectors, and internal hidden# states to generate the next word in the sequence. It continues# generating words until it outputs an *EOS_token*, representing the end# of the sentence. We use an `attention# mechanism </abs/1409.0473>`__ in our decoder to help it# to “pay attention” to certain parts of the input when generating the# output. For our model, we implement `Luong et# al. </abs/1508.04025>`__\ ’s “Global attention” module,# and use it as a submodule in our decode model.######################################################################## Data Handling# -------------## Although our models conceptually deal with sequences of tokens, in# reality, they deal with numbers like all machine learning models do. In# this case, every word in the model’s vocabulary, which was established# before training, is mapped to an integer index. We use a ``Voc`` object# to contain the mappings from word to index, as well as the total number# of words in the vocabulary. We will load the object later before we run# the model.## Also, in order for us to be able to run evaluations, we must provide a# tool for processing our string inputs. The ``normalizeString`` function# converts all characters in a string to lowercase and removes all# non-letter characters. The ``indexesFromSentence`` function takes a# sentence of words and returns the corresponding sequence of word# indexes.#class Voc:def __init__(self, name):self.name = nameself.trimmed = Falseself.word2index = {}self.word2count = {}self.index2word = {PAD_token: "PAD", SOS_token: "SOS", EOS_token: "EOS"}self.num_words = 3 # Count SOS, EOS, PADdef addSentence(self, sentence):for word in sentence.split(' '):self.addWord(word)def addWord(self, word):if word not in self.word2index:self.word2index[word] = self.num_wordsself.word2count[word] = 1self.index2word[self.num_words] = wordself.num_words += 1else:self.word2count[word] += 1# Remove words below a certain count thresholddef trim(self, min_count):if self.trimmed:returnself.trimmed = Truekeep_words = []for k, v in self.word2count.items():if v >= min_count:keep_words.append(k)print('keep_words {} / {} = {:.4f}'.format(len(keep_words), len(self.word2index), len(keep_words) / len(self.word2index)))# Reinitialize dictionariesself.word2index = {}self.word2count = {}self.index2word = {PAD_token: "PAD", SOS_token: "SOS", EOS_token: "EOS"}self.num_words = 3 # Count default tokensfor word in keep_words:self.addWord(word)# Lowercase and remove non-letter charactersdef normalizeString(s):s = s.lower()s = re.sub(r"([.!?])", r" \1", s)s = re.sub(r"[^a-zA-Z.!?]+", r" ", s)return s# Takes string sentence, returns sentence of word indexesdef indexesFromSentence(voc, sentence):return [voc.word2index[word] for word in sentence.split(' ')] + [EOS_token]####################################################################### Define Encoder# --------------## We implement our encoder’s RNN with the ``torch.nn.GRU`` module which we# feed a batch of sentences (vectors of word embeddings) and it internally# iterates through the sentences one token at a time calculating the# hidden states. We initialize this module to be bidirectional, meaning# that we have two independent GRUs: one that iterates through the# sequences in chronological order, and another that iterates in reverse# order. We ultimately return the sum of these two GRUs’ outputs. Since# our model was trained using batching, our ``EncoderRNN`` model’s# ``forward`` function expects a padded input batch. To batch# variable-length sentences, we allow a maximum of *MAX_LENGTH* tokens in# a sentence, and all sentences in the batch that have less than# *MAX_LENGTH* tokens are padded at the end with our dedicated *PAD_token*# tokens. To use padded batches with a PyTorch RNN module, we must wrap# the forward pass call with ``torch.nn.utils.rnn.pack_padded_sequence``# and ``torch.nn.utils.rnn.pad_packed_sequence`` data transformations.# Note that the ``forward`` function also takes an ``input_lengths`` list,# which contains the length of each sentence in the batch. This input is# used by the ``torch.nn.utils.rnn.pack_padded_sequence`` function when# padding.## Hybrid Frontend Notes:# ~~~~~~~~~~~~~~~~~~~~~~## Since the encoder’s ``forward`` function does not contain any# data-dependent control flow, we will use **tracing** to convert it to# script mode. When tracing a module, we can leave the module definition# as-is. We will initialize all models towards the end of this document# before we run evaluations.#class EncoderRNN(nn.Module):def __init__(self, hidden_size, embedding, n_layers=1, dropout=0):super(EncoderRNN, self).__init__()self.n_layers = n_layersself.hidden_size = hidden_sizeself.embedding = embedding# Initialize GRU; the input_size and hidden_size params are both set to 'hidden_size'# because our input size is a word embedding with number of features == hidden_sizeself.gru = nn.GRU(hidden_size, hidden_size, n_layers,dropout=(0 if n_layers == 1 else dropout), bidirectional=True)def forward(self, input_seq, input_lengths, hidden=None):# Convert word indexes to embeddingsembedded = self.embedding(input_seq)# Pack padded batch of sequences for RNN modulepacked = torch.nn.utils.rnn.pack_padded_sequence(embedded, input_lengths)# Forward pass through GRUoutputs, hidden = self.gru(packed, hidden)# Unpack paddingoutputs, _ = torch.nn.utils.rnn.pad_packed_sequence(outputs)# Sum bidirectional GRU outputsoutputs = outputs[:, :, :self.hidden_size] + outputs[:, : ,self.hidden_size:]# Return output and final hidden statereturn outputs, hidden####################################################################### Define Decoder’s Attention Module# ---------------------------------## Next, we’ll define our attention module (``Attn``). Note that this# module will be used as a submodule in our decoder model. Luong et# al. consider various “score functions”, which take the current decoder# RNN output and the entire encoder output, and return attention# “energies”. This attention energies tensor is the same size as the# encoder output, and the two are ultimately multiplied, resulting in a# weighted tensor whose largest values represent the most important parts# of the query sentence at a particular time-step of decoding.## Luong attention layerclass Attn(torch.nn.Module):def __init__(self, method, hidden_size):super(Attn, self).__init__()self.method = methodif self.method not in ['dot', 'general', 'concat']:raise ValueError(self.method, "is not an appropriate attention method.")self.hidden_size = hidden_sizeif self.method == 'general':self.attn = torch.nn.Linear(self.hidden_size, hidden_size)elif self.method == 'concat':self.attn = torch.nn.Linear(self.hidden_size * 2, hidden_size)self.v = torch.nn.Parameter(torch.FloatTensor(hidden_size))def dot_score(self, hidden, encoder_output):return torch.sum(hidden * encoder_output, dim=2)def general_score(self, hidden, encoder_output):energy = self.attn(encoder_output)return torch.sum(hidden * energy, dim=2)def concat_score(self, hidden, encoder_output):energy = self.attn(torch.cat((hidden.expand(encoder_output.size(0), -1, -1), encoder_output), 2)).tanh()return torch.sum(self.v * energy, dim=2)def forward(self, hidden, encoder_outputs):# Calculate the attention weights (energies) based on the given methodif self.method == 'general':attn_energies = self.general_score(hidden, encoder_outputs)elif self.method == 'concat':attn_energies = self.concat_score(hidden, encoder_outputs)elif self.method == 'dot':attn_energies = self.dot_score(hidden, encoder_outputs)# Transpose max_length and batch_size dimensionsattn_energies = attn_energies.t()# Return the softmax normalized probability scores (with added dimension)return F.softmax(attn_energies, dim=1).unsqueeze(1)####################################################################### Define Decoder# --------------## Similarly to the ``EncoderRNN``, we use the ``torch.nn.GRU`` module for# our decoder’s RNN. This time, however, we use a unidirectional GRU. It# is important to note that unlike the encoder, we will feed the decoder# RNN one word at a time. We start by getting the embedding of the current# word and applying a# `dropout </docs/stable/nn.html?highlight=dropout#torch.nn.Dropout>`__.# Next, we forward the embedding and the last hidden state to the GRU and# obtain a current GRU output and hidden state. We then use our ``Attn``# module as a layer to obtain the attention weights, which we multiply by# the encoder’s output to obtain our attended encoder output. We use this# attended encoder output as our ``context`` tensor, which represents a# weighted sum indicating what parts of the encoder’s output to pay# attention to. From here, we use a linear layer and softmax normalization# to select the next word in the output sequence.## Hybrid Frontend Notes:# ~~~~~~~~~~~~~~~~~~~~~~## Similarly to the ``EncoderRNN``, this module does not contain any# data-dependent control flow. Therefore, we can once again use# **tracing** to convert this model to Torch Script after it is# initialized and its parameters are loaded.#class LuongAttnDecoderRNN(nn.Module):def __init__(self, attn_model, embedding, hidden_size, output_size, n_layers=1, dropout=0.1):super(LuongAttnDecoderRNN, self).__init__()# Keep for referenceself.attn_model = attn_modelself.hidden_size = hidden_sizeself.output_size = output_sizeself.n_layers = n_layersself.dropout = dropout# Define layersself.embedding = embeddingself.embedding_dropout = nn.Dropout(dropout)self.gru = nn.GRU(hidden_size, hidden_size, n_layers, dropout=(0 if n_layers == 1 else dropout))self.concat = nn.Linear(hidden_size * 2, hidden_size)self.out = nn.Linear(hidden_size, output_size)self.attn = Attn(attn_model, hidden_size)def forward(self, input_step, last_hidden, encoder_outputs):# Note: we run this one step (word) at a time# Get embedding of current input wordembedded = self.embedding(input_step)embedded = self.embedding_dropout(embedded)# Forward through unidirectional GRUrnn_output, hidden = self.gru(embedded, last_hidden)# Calculate attention weights from the current GRU outputattn_weights = self.attn(rnn_output, encoder_outputs)# Multiply attention weights to encoder outputs to get new "weighted sum" context vectorcontext = attn_weights.bmm(encoder_outputs.transpose(0, 1))# Concatenate weighted context vector and GRU output using Luong eq. 5rnn_output = rnn_output.squeeze(0)context = context.squeeze(1)concat_input = torch.cat((rnn_output, context), 1)concat_output = torch.tanh(self.concat(concat_input))# Predict next word using Luong eq. 6output = self.out(concat_output)output = F.softmax(output, dim=1)# Return output and final hidden statereturn output, hidden####################################################################### Define Evaluation# -----------------## Greedy Search Decoder# ~~~~~~~~~~~~~~~~~~~~~## As in the chatbot tutorial, we use a ``GreedySearchDecoder`` module to# facilitate the actual decoding process. This module has the trained# encoder and decoder models as attributes, and drives the process of# encoding an input sentence (a vector of word indexes), and iteratively# decoding an output response sequence one word (word index) at a time.## Encoding the input sequence is straightforward: simply forward the# entire sequence tensor and its corresponding lengths vector to the# ``encoder``. It is important to note that this module only deals with# one input sequence at a time, **NOT** batches of sequences. Therefore,# when the constant **1** is used for declaring tensor sizes, this# corresponds to a batch size of 1. To decode a given decoder output, we# must iteratively run forward passes through our decoder model, which# outputs softmax scores corresponding to the probability of each word# being the correct next word in the decoded sequence. We initialize the# ``decoder_input`` to a tensor containing an *SOS_token*. After each pass# through the ``decoder``, we *greedily* append the word with the highest# softmax probability to the ``decoded_words`` list. We also use this word# as the ``decoder_input`` for the next iteration. The decoding process# terminates either if the ``decoded_words`` list has reached a length of# *MAX_LENGTH* or if the predicted word is the *EOS_token*.## Hybrid Frontend Notes:# ~~~~~~~~~~~~~~~~~~~~~~## The ``forward`` method of this module involves iterating over the range# of :math:`[0, max\_length)` when decoding an output sequence one word at# a time. Because of this, we should use **scripting** to convert this# module to Torch Script. Unlike with our encoder and decoder models,# which we can trace, we must make some necessary changes to the# ``GreedySearchDecoder`` module in order to initialize an object without# error. In other words, we must ensure that our module adheres to the# rules of the scripting mechanism, and does not utilize any language# features outside of the subset of Python that Torch Script includes.## To get an idea of some manipulations that may be required, we will go# over the diffs between the ``GreedySearchDecoder`` implementation from# the chatbot tutorial and the implementation that we use in the cell# below. Note that the lines highlighted in red are lines removed from the# original implementation and the lines highlighted in green are new.## .. figure:: /_static/img/chatbot/diff.png# :align: center# :alt: diff## Changes:# ^^^^^^^^## - ``nn.Module`` -> ``torch.jit.ScriptModule``## - In order to use PyTorch’s scripting mechanism on a module, that# module must inherit from the ``torch.jit.ScriptModule``.### - Added ``decoder_n_layers`` to the constructor arguments## - This change stems from the fact that the encoder and decoder# models that we pass to this module will be a child of# ``TracedModule`` (not ``Module``). Therefore, we cannot access the# decoder’s number of layers with ``decoder.n_layers``. Instead, we# plan for this, and pass this value in during module construction.### - Store away new attributes as constants## - In the original implementation, we were free to use variables from# the surrounding (global) scope in our ``GreedySearchDecoder``\ ’s# ``forward`` method. However, now that we are using scripting, we# do not have this freedom, as the assumption with scripting is that# we cannot necessarily hold on to Python objects, especially when# exporting. An easy solution to this is to store these values from# the global scope as attributes to the module in the constructor,# and add them to a special list called ``__constants__`` so that# they can be used as literal values when constructing the graph in# the ``forward`` method. An example of this usage is on NEW line# 19, where instead of using the ``device`` and ``SOS_token`` global# values, we use our constant attributes ``self._device`` and# ``self._SOS_token``.### - Add the ``torch.jit.script_method`` decorator to the ``forward``# method## - Adding this decorator lets the JIT compiler know that the function# that it is decorating should be scripted.### - Enforce types of ``forward`` method arguments## - By default, all parameters to a Torch Script function are assumed# to be Tensor. If we need to pass an argument of a different type,# we can use function type annotations as introduced in `PEP# 3107 </dev/peps/pep-3107/>`__. In addition,# it is possible to declare arguments of different types using# MyPy-style type annotations (see# `doc </docs/master/jit.html#types>`__).### - Change initialization of ``decoder_input``## - In the original implementation, we initialized our# ``decoder_input`` tensor with ``torch.LongTensor([[SOS_token]])``.# When scripting, we are not allowed to initialize tensors in a# literal fashion like this. Instead, we can initialize our tensor# with an explicit torch function such as ``torch.ones``. In this# case, we can easily replicate the scalar ``decoder_input`` tensor# by multiplying 1 by our SOS_token value stored in the constant# ``self._SOS_token``.#class GreedySearchDecoder(torch.jit.ScriptModule):def __init__(self, encoder, decoder, decoder_n_layers):super(GreedySearchDecoder, self).__init__()self.encoder = encoderself.decoder = decoderself._device = deviceself._SOS_token = SOS_tokenself._decoder_n_layers = decoder_n_layers__constants__ = ['_device', '_SOS_token', '_decoder_n_layers']@torch.jit.script_methoddef forward(self, input_seq : torch.Tensor, input_length : torch.Tensor, max_length : int):# Forward input through encoder modelencoder_outputs, encoder_hidden = self.encoder(input_seq, input_length)# Prepare encoder's final hidden layer to be first hidden input to the decoderdecoder_hidden = encoder_hidden[:self._decoder_n_layers]# Initialize decoder input with SOS_tokendecoder_input = torch.ones(1, 1, device=self._device, dtype=torch.long) * self._SOS_token# Initialize tensors to append decoded words toall_tokens = torch.zeros([0], device=self._device, dtype=torch.long)all_scores = torch.zeros([0], device=self._device)# Iteratively decode one word token at a timefor _ in range(max_length):# Forward pass through decoderdecoder_output, decoder_hidden = self.decoder(decoder_input, decoder_hidden, encoder_outputs)# Obtain most likely word token and its softmax scoredecoder_scores, decoder_input = torch.max(decoder_output, dim=1)# Record token and scoreall_tokens = torch.cat((all_tokens, decoder_input), dim=0)all_scores = torch.cat((all_scores, decoder_scores), dim=0)# Prepare current token to be next decoder input (add a dimension)decoder_input = torch.unsqueeze(decoder_input, 0)# Return collections of word tokens and scoresreturn all_tokens, all_scores####################################################################### Evaluating an Input# ~~~~~~~~~~~~~~~~~~~## Next, we define some functions for evaluating an input. The ``evaluate``# function takes a normalized string sentence, processes it to a tensor of# its corresponding word indexes (with batch size of 1), and passes this# tensor to a ``GreedySearchDecoder`` instance called ``searcher`` to# handle the encoding/decoding process. The searcher returns the output# word index vector and a scores tensor corresponding to the softmax# scores for each decoded word token. The final step is to convert each# word index back to its string representation using ``voc.index2word``.## We also define two functions for evaluating an input sentence. The# ``evaluateInput`` function prompts a user for an input, and evaluates# it. It will continue to ask for another input until the user enters ‘q’# or ‘quit’.## The ``evaluateExample`` function simply takes a string input sentence as# an argument, normalizes it, evaluates it, and prints the response.#def evaluate(encoder, decoder, searcher, voc, sentence, max_length=MAX_LENGTH):### Format input sentence as a batch# words -> indexesindexes_batch = [indexesFromSentence(voc, sentence)]# Create lengths tensorlengths = torch.tensor([len(indexes) for indexes in indexes_batch])# Transpose dimensions of batch to match models' expectationsinput_batch = torch.LongTensor(indexes_batch).transpose(0, 1)# Use appropriate deviceinput_batch = input_batch.to(device)lengths = lengths.to(device)# Decode sentence with searchertokens, scores = searcher(input_batch, lengths, max_length)# indexes -> wordsdecoded_words = [voc.index2word[token.item()] for token in tokens]return decoded_words# Evaluate inputs from user input (stdin)def evaluateInput(encoder, decoder, searcher, voc):input_sentence = ''while(1):try:# Get input sentenceinput_sentence = input('> ')# Check if it is quit caseif input_sentence == 'q' or input_sentence == 'quit': break# Normalize sentenceinput_sentence = normalizeString(input_sentence)# Evaluate sentenceoutput_words = evaluate(encoder, decoder, searcher, voc, input_sentence)# Format and print response sentenceoutput_words[:] = [x for x in output_words if not (x == 'EOS' or x == 'PAD')]print('Bot:', ' '.join(output_words))except KeyError:print("Error: Encountered unknown word.")# Normalize input sentence and call evaluate()def evaluateExample(sentence, encoder, decoder, searcher, voc):print("> " + sentence)# Normalize sentenceinput_sentence = normalizeString(sentence)# Evaluate sentenceoutput_words = evaluate(encoder, decoder, searcher, voc, input_sentence)output_words[:] = [x for x in output_words if not (x == 'EOS' or x == 'PAD')]print('Bot:', ' '.join(output_words))####################################################################### Load Pretrained Parameters# --------------------------## Ok, its time to load our model!## Use hosted model# ~~~~~~~~~~~~~~~~## To load the hosted model:## 1) Download the model `here </models/tutorials/4000_checkpoint.tar>`__.## 2) Set the ``loadFilename`` variable to the path to the downloaded# checkpoint file.## 3) Leave the ``checkpoint = torch.load(loadFilename)`` line uncommented,# as the hosted model was trained on CPU.## Use your own model# ~~~~~~~~~~~~~~~~~~## To load your own pre-trained model:## 1) Set the ``loadFilename`` variable to the path to the checkpoint file# that you wish to load. Note that if you followed the convention for# saving the model from the chatbot tutorial, this may involve changing# the ``model_name``, ``encoder_n_layers``, ``decoder_n_layers``,# ``hidden_size``, and ``checkpoint_iter`` (as these values are used in# the model path).## 2) If you trained the model on a CPU, make sure that you are opening the# checkpoint with the ``checkpoint = torch.load(loadFilename)`` line.# If you trained the model on a GPU and are running this tutorial on a# CPU, uncomment the# ``checkpoint = torch.load(loadFilename, map_location=torch.device('cpu'))``# line.## Hybrid Frontend Notes:# ~~~~~~~~~~~~~~~~~~~~~~## Notice that we initialize and load parameters into our encoder and# decoder models as usual. Also, we must call ``.to(device)`` to set the# device options of the models and ``.eval()`` to set the dropout layers# to test mode **before** we trace the models. ``TracedModule`` objects do# not inherit the ``to`` or ``eval`` methods.#save_dir = os.path.join("data", "save")corpus_name = "cornell movie-dialogs corpus"# Configure modelsmodel_name = 'cb_model'attn_model = 'dot'#attn_model = 'general'#attn_model = 'concat'hidden_size = 500encoder_n_layers = 2decoder_n_layers = 2dropout = 0.1batch_size = 64# If you're loading your own model# Set checkpoint to load fromcheckpoint_iter = 4000# loadFilename = os.path.join(save_dir, model_name, corpus_name,# '{}-{}_{}'.format(encoder_n_layers, decoder_n_layers, hidden_size),# '{}_checkpoint.tar'.format(checkpoint_iter))# If you're loading the hosted modelloadFilename = 'data/4000_checkpoint.tar'# Load model# Force CPU device options (to match tensors in this tutorial)checkpoint = torch.load(loadFilename, map_location=torch.device('cpu'))encoder_sd = checkpoint['en']decoder_sd = checkpoint['de']encoder_optimizer_sd = checkpoint['en_opt']decoder_optimizer_sd = checkpoint['de_opt']embedding_sd = checkpoint['embedding']voc = Voc(corpus_name)voc.__dict__ = checkpoint['voc_dict']print('Building encoder and decoder ...')# Initialize word embeddingsembedding = nn.Embedding(voc.num_words, hidden_size)embedding.load_state_dict(embedding_sd)# Initialize encoder & decoder modelsencoder = EncoderRNN(hidden_size, embedding, encoder_n_layers, dropout)decoder = LuongAttnDecoderRNN(attn_model, embedding, hidden_size, voc.num_words, decoder_n_layers, dropout)# Load trained model paramsencoder.load_state_dict(encoder_sd)decoder.load_state_dict(decoder_sd)# Use appropriate deviceencoder = encoder.to(device)decoder = decoder.to(device)# Set dropout layers to eval modeencoder.eval()decoder.eval()print('Models built and ready to go!')####################################################################### Convert Model to Torch Script# -----------------------------## Encoder# ~~~~~~~## As previously mentioned, to convert the encoder model to Torch Script,# we use **tracing**. Tracing any module requires running an example input# through the model’s ``forward`` method and trace the computational graph# that the data encounters. The encoder model takes an input sequence and# a corresponding lengths tensor. Therefore, we create an example input# sequence tensor ``test_seq``, which is of appropriate size (MAX_LENGTH,# 1), contains numbers in the appropriate range# :math:`[0, voc.num\_words)`, and is of the appropriate type (int64). We# also create a ``test_seq_length`` scalar which realistically contains# the value corresponding to how many words are in the ``test_seq``. The# next step is to use the ``torch.jit.trace`` function to trace the model.# Notice that the first argument we pass is the module that we want to# trace, and the second is a tuple of arguments to the module’s# ``forward`` method.## Decoder# ~~~~~~~## We perform the same process for tracing the decoder as we did for the# encoder. Notice that we call forward on a set of random inputs to the# traced_encoder to get the output that we need for the decoder. This is# not required, as we could also simply manufacture a tensor of the# correct shape, type, and value range. This method is possible because in# our case we do not have any constraints on the values of the tensors# because we do not have any operations that could fault on out-of-range# inputs.## GreedySearchDecoder# ~~~~~~~~~~~~~~~~~~~## Recall that we scripted our searcher module due to the presence of# data-dependent control flow. In the case of scripting, we do the# conversion work up front by adding the decorator and making sure the# implementation complies with scripting rules. We initialize the scripted# searcher the same way that we would initialize an un-scripted variant.#### Convert encoder model# Create artificial inputstest_seq = torch.LongTensor(MAX_LENGTH, 1).random_(0, voc.num_words)test_seq_length = torch.LongTensor([test_seq.size()[0]])# Trace the modeltraced_encoder = torch.jit.trace(encoder, (test_seq, test_seq_length))### Convert decoder model# Create and generate artificial inputstest_encoder_outputs, test_encoder_hidden = traced_encoder(test_seq, test_seq_length)test_decoder_hidden = test_encoder_hidden[:decoder.n_layers]test_decoder_input = torch.LongTensor(1, 1).random_(0, voc.num_words)# Trace the modeltraced_decoder = torch.jit.trace(decoder, (test_decoder_input, test_decoder_hidden, test_encoder_outputs))### Initialize searcher modulescripted_searcher = GreedySearchDecoder(traced_encoder, traced_decoder, decoder.n_layers)####################################################################### Print Graphs# ------------## Now that our models are in Torch Script form, we can print the graphs of# each to ensure that we captured the computational graph appropriately.# Since our ``scripted_searcher`` contains our ``traced_encoder`` and# ``traced_decoder``, these graphs will print inline.#print('scripted_searcher graph:\n', scripted_searcher.graph)####################################################################### Run Evaluation# --------------## Finally, we will run evaluation of the chatbot model using the Torch# Script models. If converted correctly, the models will behave exactly as# they would in their eager-mode representation.## By default, we evaluate a few common query sentences. If you want to# chat with the bot yourself, uncomment the ``evaluateInput`` line and# give it a spin.## Evaluate examplessentences = ["hello", "what's up?", "who are you?", "where am I?", "where are you from?"]for s in sentences:evaluateExample(s, traced_encoder, traced_decoder, scripted_searcher, voc)# Evaluate your input#evaluateInput(traced_encoder, traced_decoder, scripted_searcher, voc)####################################################################### Save Model# ----------## Now that we have successfully converted our model to Torch Script, we# will serialize it for use in a non-Python deployment environment. To do# this, we can simply save our ``scripted_searcher`` module, as this is# the user-facing interface for running inference against the chatbot# model. When saving a Script module, use script_module.save(PATH) instead# of torch.save(model, PATH).#scripted_searcher.save("scripted_chatbot.pth")